The simple way to turn off Windows Defender on Windows 10
Anyone using Windows 10 is likely aware of the Windows Defender software, which is Microsoft's antivirus program integrated into Windows 10. However, this software has its limitations as it only provides basic protection and does not have too many features. And for some reason, if you want to disable Windows Defender but don't know how to, the following article will guide you through the simplest methods to turn off Windows Defender on Windows 10.
1. Temporarily disable Windows Defender using Settings
If you only want to temporarily turn off Windows Defender, follow these steps:
Step 1: Enter Windows Defender Security Center into the search box to open Windows Security.
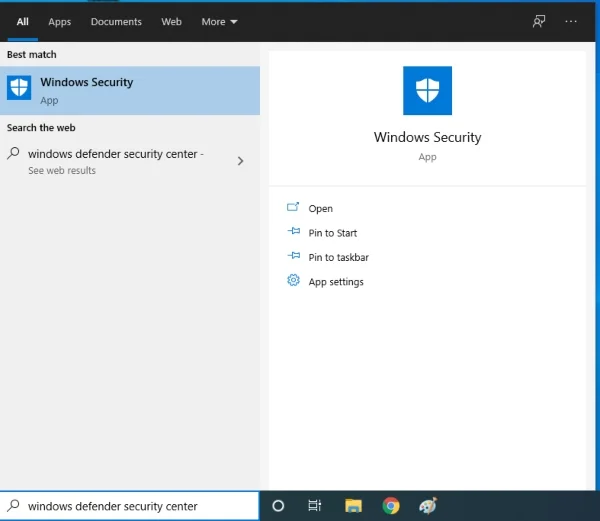
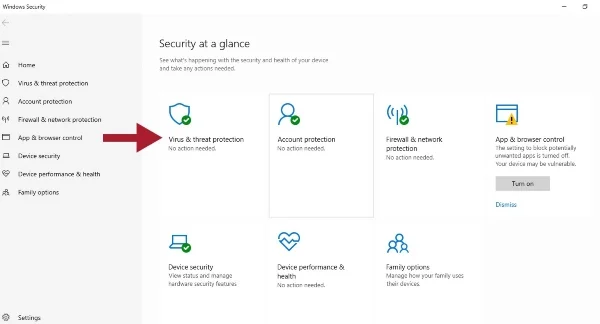
Step 2: Click on Virus & Threat protection.
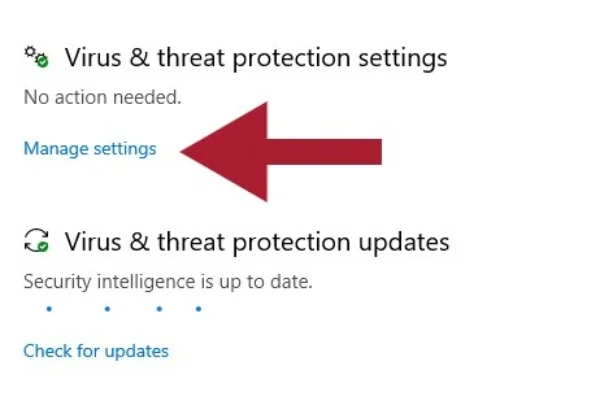
Step 3: Scroll down and select Manage settings under the Virus & Threat protection settings section.
Step 4: Toggle the Real-time protection option to OFF.
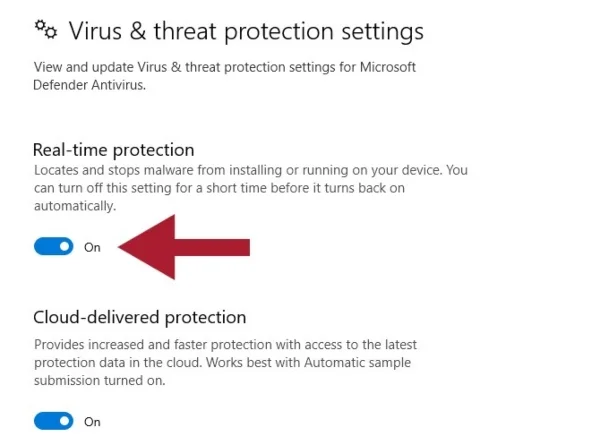
This method is suitable if you want to temporarily disable Windows Defender to install a new software program.
2. Temporarily disable Windows Defender using Local Group Policy
Step 1: Press the Windows + R keys to open the Run command window.
Step 2: Type gpedit.msc in the Run window and press Enter or click OK to open the Local Group Policy Editor.

Step 3: In the Local Group Policy Editor window, navigate to the following path: Computer Configuration > Administrative Templates > Windows Components > Windows Defender.
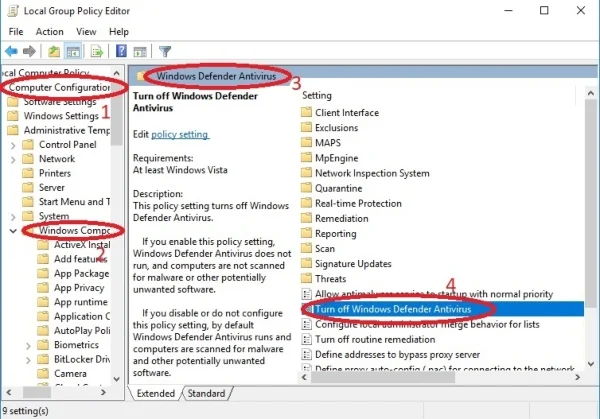
Step 4: Select Enabled to turn off Windows Defender.
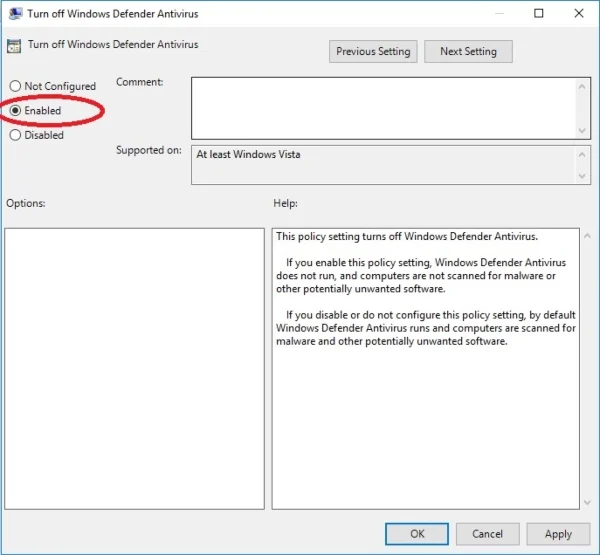
Step 5: Then click Apply and OK.
After completing the above steps, restart Windows, and Windows Defender will be turned off. If you want to re-enable Windows Defender later, repeat the steps above, but in the last step select Not configured instead of Enabled.
Note: This method is not available for Windows 10 Home edition. For Windows 10 Home, another suitable method is using the Registry.
3. Disable Windows Defender using Registry Editor
As mentioned above, if your computer is running Windows 10 Home, you won't be able to access the Local Group Policy Editor. However, you can still use the Registry to disable Windows Defender.
Caution: Before performing this method, you should back up your Registry to prevent undesirable outcomes. Back up by opening the File tab >> Export... to save a backup Registry file. Whenever you want to restore, open the File tab > Import... then locate the backup file and restore.
Step 1: Press the Windows + R keys to open the Run command window, then type regedit and press Enter (or click OK) to open the Registry Editor.

Step 2: In the Registry Editor, navigate to HKEY_LOCAL_MACHINE >> SOFTWARE >> Policies >> Microsoft >> Windows Defender.
Step 3: If you don't find the DWORD DisableAntiSpyware, right-click on any empty space, then select New >> DWORD (32-bit) Value.
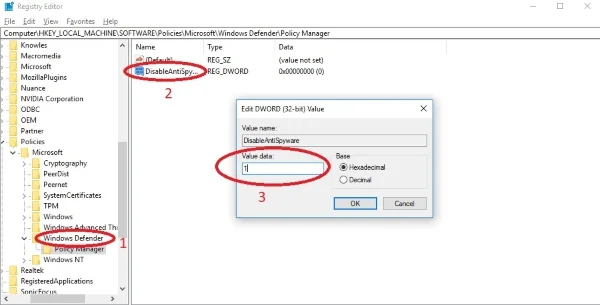
Step 4: Name the new key DisableAntiSpyware.
Step 5: Double-click the new key you created, and change the Value Data from 0 to 1.
Step 6: Restart your computer to complete the process.
If you want to re-enable Windows Defender later, just redo the above steps, and in step 5, change the Value Data from 1 back to 0, then restart your computer.
Submit feedback
Your email address will not be made public. Fields marked are required *
Search
Trend
-
What is Black Myth: Wukong? Detailed Guide on System Requirements and Gameplay
08-21-2024 . 1k view
-
The simplest and fastest way to log into the Chinese TikTok, Douyin.
01-10-2022 . 1k view
-
Blog sites that will accept AI generated content
07-26-2024 . 1k view
-
Call of Duty: Black Ops 6 - Intense, Mysterious, and Surprising Warfare
09-02-2024 . 1k view
-
The "End of Life" for Windows 10: A Massive E-Waste Threat and Sustainable Solutions
08-18-2024 . 964 view


0 feedback