How to Take a Screenshot on a Chromebook
Taking screenshots on a computer can be beneficial for many reasons, such as quickly sharing a technical issue you're facing, capturing ideas for a big project, or guiding friends or family members through a specific task. However, the method for taking screenshots can vary depending on the device and operating system, including on Chromebooks and ChromeOS.
Previously, the screenshot tool on Chromebooks was quite basic and could only be launched using an unclear keyboard shortcut. However, last year, Google upgraded this tool, allowing you to capture both images and video of your screen. Below are two ways to launch the Screen Capture tool, how to use it, and where to find the screenshots after you take them.
Taking Screenshots Using Keyboard Shortcuts on a Chromebook
To open the Screen Capture toolbar, press the keyboard shortcut Shift + Ctrl + Show Windows. The Show Windows key is located on the top row of the keyboard, with an icon that looks like two overlapping windows. When you press this combination, the toolbar will appear at the bottom of the screen.
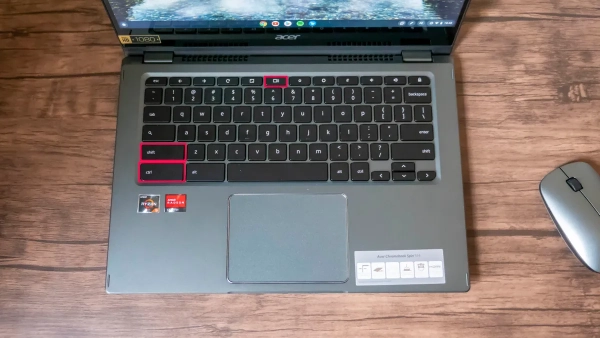
If you want to capture the entire screen instead of a specific area or window, simply press Ctrl + Show Windows.
These keyboard shortcuts work on all Chromebook models. Additionally, some Chromebooks have a dedicated Screenshot key in the function key row. Look for a key with a camera icon, usually depicted as a rectangle with a circle inside. Pressing this key automatically launches the tool without needing to use a combination of keys.
Taking Screenshots from the Quick Settings Panel
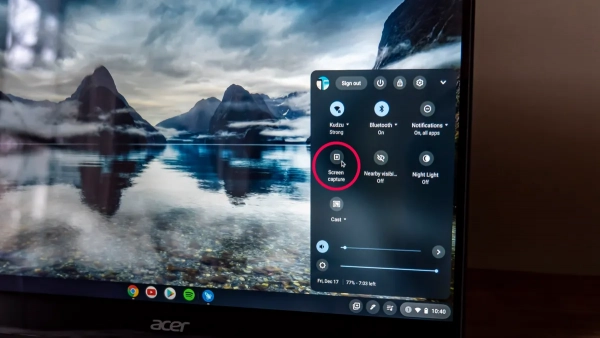
If you have trouble remembering the keyboard shortcuts, Google has added a screenshot button to the Quick Settings Panel. On the Chrome Shelf, click on the current time to open the Quick Settings menu, then select Screen Capture, and the toolbar will launch.
How to Use the Screen Capture Toolbar
The Screen Capture toolbar allows you not only to take screenshots but also to record video of your screen. The toggle button to switch between photo and video mode is located on the left side of the toolbar. To the right of this button, there are options to capture the entire screen, a specific portion of the screen, or a specific window. These options apply to both photos and videos. Additionally, you can click on the gear icon to enable or disable the microphone while recording, making it easy to add narration to your captures.
Where Are Screenshots Saved on a Chromebook?
When you take a screenshot or record, the file is temporarily stored in the Clipboard, which holds the last five items you saved. To access these items, press Everything key (Search key) + V.
Additionally, your Chromebook has a storage area on the Shelf called Tote, where you can find your most recent screenshots. You can also pin important files to Tote for easy access without needing to search for them.
Screenshots no longer stored on the Clipboard can be found in the Files app. Open the Files app on your Chromebook, and you will find screenshots in the "Images" folder and screen recordings in the "Videos" folder.
Submit feedback
Your email address will not be made public. Fields marked are required *
Search
Trend
-
What is Black Myth: Wukong? Detailed Guide on System Requirements and Gameplay
08-21-2024 . 1k view
-
The simplest and fastest way to log into the Chinese TikTok, Douyin.
01-10-2022 . 1k view
-
Blog sites that will accept AI generated content
07-26-2024 . 1k view
-
Call of Duty: Black Ops 6 - Intense, Mysterious, and Surprising Warfare
09-02-2024 . 1k view
-
The "End of Life" for Windows 10: A Massive E-Waste Threat and Sustainable Solutions
08-18-2024 . 970 view




0 feedback