
Translate to English: Margin alignment is one of the necessary editing actions for a document to have a complete layout. Depending on the purpose of the document, there are many different margin sizes. For standard and widely applied documents such as regulations, rules, statutes, laws, circulars, etc., there must be a certain standard.
I. Current standard for document margin size
All documents and administrative materials prepared formally in schools, offices, and administrative agencies have a standard for margins in word files. Specifically, the standard margin size for an A4 paper form is as follows:
- Top margin, on the dialog box in English word is Top: 20 - 25mm
- Bottom margin, on the dialog box in English word is Bottom: 20 - 25mm
- Left margin, in English it is Left: 30 - 35mm
- Right margin, in English it is Right: 15 -20mm
- In your work or studies, when you need to draft a document, you need to adjust the margins in Word according to the above instructions. This is especially important for those working in the public administration sector, as it is clearly stipulated in Circular 01/2011/TT-BNV.
II. Detailed guide to adjusting margins in Word for beginners
Aligning margins in a Word file is a simple task for those who frequently work with drafting various types of documents, papers, and administrative affairs. For those who are new to Word or still unclear about how to align margins, there is no need to worry.
Margin alignment is performed with extremely simple tasks. All detailed instructions on how to align margins in Word are specifically guided below.
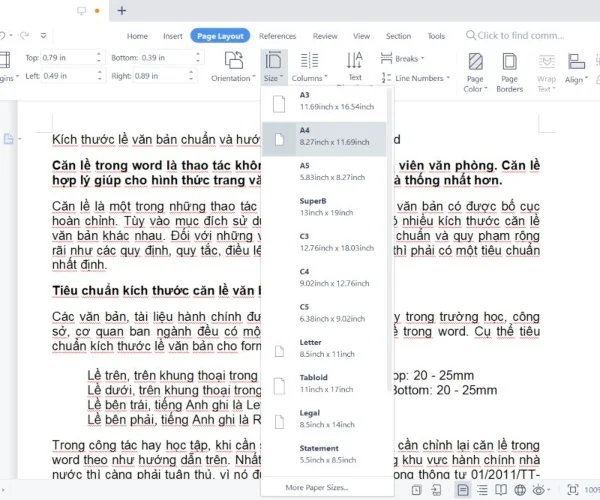
All administrative documents use A4 size, so we will learn to align the standard margins of the A4 form. Other sizes like A5, A3 are performed similarly.
1. Step 1: Set the A4 document size format
On the toolbar, click on the Page Layout tab. In the Page Setup area, select Size and choose the document size of A4.
2. Step 2: Set standard margin size for documents
On the Page Layout tab, select Margins. There are also some Word suggestions for margin sizes in Margins such as Normal, Narrow, Moderate, Wide, and the most recently used margin alignment.
If you find it suitable, you just need to click on that item and your entire document will be set to align the margin to the selected size.

a. Margin sizes
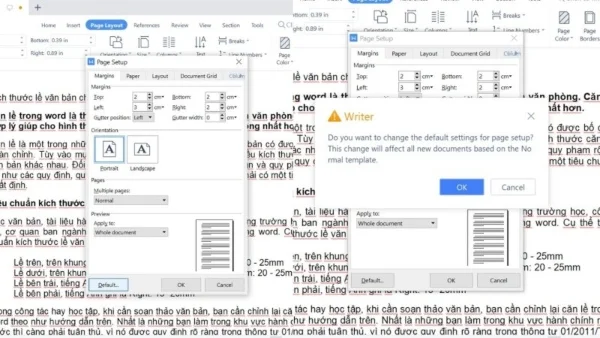
If you want to create a new margin setting, select Custom Margins… at the end. A Page Setup dialog will pop up for you to enter the desired size in the Margins tab.
- Top is the top margin, counted from the edge of the paper at the top to the first line of the document
- Bottom margin, calculated from the edge of the paper at the bottom to the last line of the document.
- Left is the left margin, counted from the edge of the paper on the left to the first character on the left of the line of text.
- Right is the right margin, measured from the edge of the paper on the right to the last character on the right of the line of text.
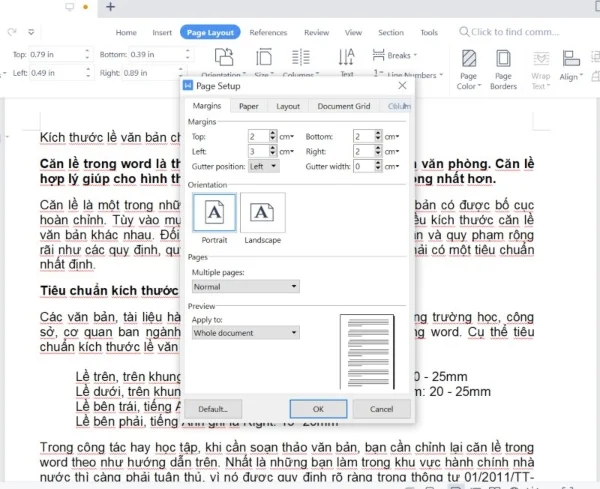
b. Bookbinding sizes
Gutter position is the default binding position, which is Left.
Gutter width is the binding size.
According to the standard for our administrative documents, the left margin size is 30-35mm. This size already includes the left binding part, so you don't need to worry about this content.
c. Other information
Orientation is the orientation of the document page. You can choose the paper for portrait - Portrait or paper for landscape - Landscape.
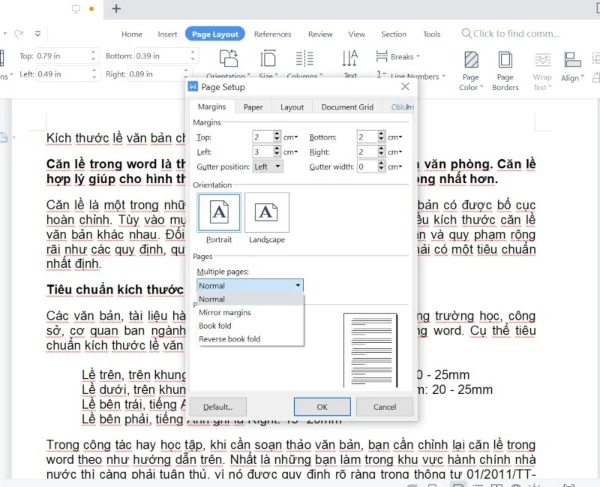
Pages/ Multiple Page is default as Normal - Normal. You can click on the arrow and try other formats.
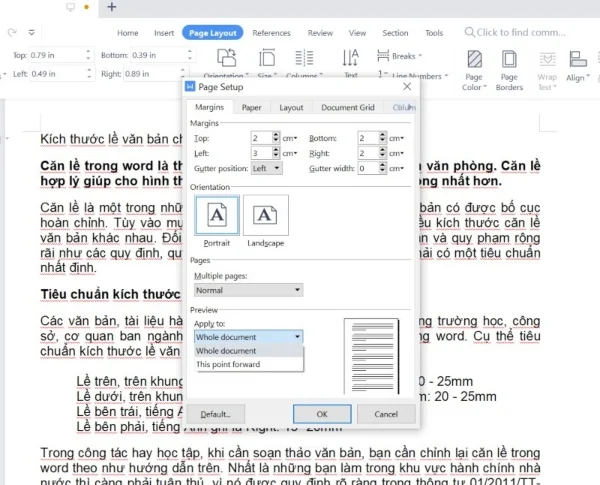
Preview/ Apply to default is Whole Document - Entire document. That is, the settings you set above will apply to all pages in the document. There is also a This point forward mode where settings will only appear from the bouncing mouse cursor page and the following pages.
Next to the Preview box there is a document page for you to preview how the document is displayed based on the options above.
A little note for you is that there is a Paper tab next to the Margins tab in the Page Setup dialog box. In this Paper tab, you can adjust the A4, A3,... document size arbitrarily for the entire document or only from the positioned page onwards. If you forget to perform Step 1, you can finish it at Step 2 or skip Step 1 completely.
3. Step 3: Complete the setup
After selecting the correct margin size, remember to press the OK button for the command to be executed.
III. Instructions for setting default margins
Default alignment means that in the future when you open a new Word file, it will automatically be in the state of aligning the margins according to the most recently set size.
Setting default margins is similar to Step 2 of regular margin alignment. At Step 3, instead of pressing OK, you press the Default or Set as Default button and choose Yes or OK for the pop-up dialog box.
If you want to change to the default margin in word, you just repeat this operation. The system will automatically change and apply the latest default margin.
The operations to align margins in Word are really simple. You just need to practice a few times to remember the operation. Also, don't forget the standard margin of the formal document, so you can apply it later.

Ngọc Phương
Web Developer
Thank you for visiting my blog. My name is Phuong and I have more than 10 years of experience in website development. I am confident in asserting myself as an expert in creating impressive and effective websites. Anyone in need of website design can contact me via Zalo at 0935040740.
Submit feedback
Your email address will not be made public. Fields marked are required *
Search
Trend
-

The most commonly used HTML tags
02-01-2020 . 11k view
-

Websites for earning money at home by typing documents
05-17-2023 . 9k view
-

-

Earn money by answering surveys with Toluna
01-12-2020 . 7k view
-

Guide to creating a database in phpMyAdmin XAMPP
04-25-2020 . 4k view


0 feedback