
The table of contents is an important part of a document in Word. Many people overlook this, making the document disorganized and lacking professionalism. How do you create a table of contents in Word? It's extremely simple. Spend just 30 seconds to learn how to quickly and efficiently create an automatic table of contents in Word. Even if you're not computer savvy, you can do it.
I. What is Microsoft Word?
Microsoft Word is a text editing software included in the Microsoft Office suite. Word is the most popular text editing and processing software available today. The software allows users to process and edit text in any way they choose.
Microsoft Word currently has many updated versions. Each version has its unique features to enhance the user experience. Therefore, each version offers a different way to create a table of contents to make your thesis or document more complete.
II. Why should you create an automatic table of contents?
Before delving into how to create a table of contents in Word, we need to understand what a table of contents is and its function. A table of contents compiles the categories, headings of theses, documents, books, etc.
The table of contents helps readers grasp the main content of the document and how the content is structured. A table of contents will make your thesis or document more professional. For electronic documents, readers can quickly navigate to the content they want to read. The table of contents plays an especially important role when you create a document in Word.
III. How to create an automatic table of contents in Word for all versions
Versions of Word from 2007, 2010, 2013, to 2016 all have quite similar steps for creating an automatic table of contents.
1. Choose content for the table of contents
To create an automatic table of contents, you must determine the main and sub-headings in your document. Organize the hierarchy of the headings in 2 ways:
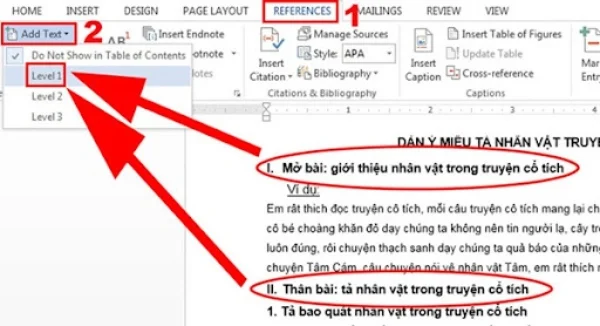
Method 1: Mark table of contents using Add Text in Table of Contents
Step 1: Select the content for the table of contents, which are the main and sub-headings.
Step 2: Click on the Tab References → choose Add Text → Select the appropriate Level for each heading.
- Main heading content should be marked as level 1
- Subheading content should be marked at decreasing levels from 2 - 3 - 4.
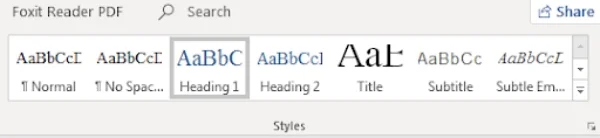
Method 2: Use Heading Styles from the Home tab
When drafting a document in Word, the table of contents depends on the heading format you select.
If you use Heading 1, Heading 2, and specified font styles for headings, creating a table of contents becomes much easier. To use this method, follow these two steps.
Step 1: Select the header you want in the table of contents. Highlight the text then go to Home → choose the Styles you want to format.
Step 2: Choose the appropriate Header for the heading. For example: Heading 1, Heading 2, etc.
- If you need more Style options suited to your document, click the arrow to expand the Quick Styles Gallery.
- If the style you want does not appear, click Save Selection as New Quick Style.
2. How to create a table of contents
To create a table of contents, follow these 2 steps:
Step 1: Move the cursor to the location you want the table of contents to be (usually at the beginning or end of the document). You can use “Ctrl + Enter” to create a new page.
Step 2: Go to the Reference section → In Table of Contents, click and choose a suitable table of contents. Here you can choose a pre-made template from the system (Automatic Table) or create a custom table of contents (Custom Table of Contents).
If you want to choose a pre-made template, you can visit the official Office website by searching “More Table of Content” If you prefer a custom table of contents, in “Custom Table of Content” you have 2 options: Tab Leader (tab format) and None (nothing) For the Format: Choose the format you wish to create your table of contents.
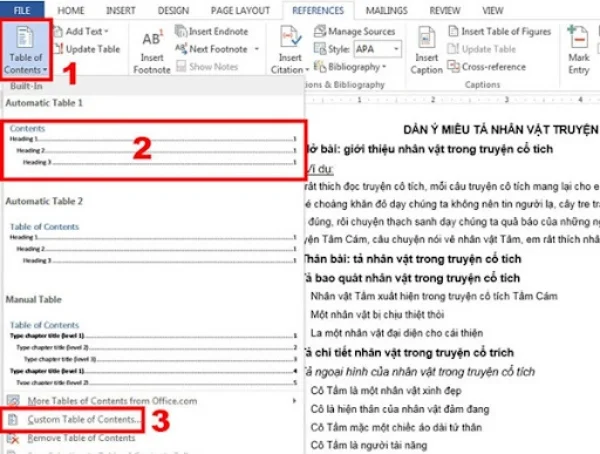
Step 3: After creating the table of contents, if you want to edit its content, right-click on the content table and select Update Table…
Please note when making a table of contents in Word, you need to format Heading 1 as the main title. Heading 2 as a sub-title, and continue with Heading 3 and Heading 4. If you want both main and subordinate headings in the table of contents, you need to format the headings and choose the appropriate table of contents style.
3. Update the table of contents
Once your thesis or document is complete, there will usually be changes to the headings and page numbers. To update the table of contents accurately, you can follow these 2 methods:
Method 1: Right-click within the table of contents → choose Update Field.
Method 2: In the References tab, select Update Table in the Table of Contents section. To update the page numbers of the headings, choose Update Page Numbers Only. Or, if you change the content of the headings and update the page numbers, choose Update Entire Table. Then, press OK to update the table of contents.

A complete table of contents is very helpful for readers. Moreover, the table of contents can make your document more professional. The above article describes the simplest way to create a table of contents in Word. To produce a beautiful table of contents, you should visualize the layout and create Heading tags appropriate for the table of contents.

Ngọc Phương
Web Developer
Thank you for visiting my blog. My name is Phuong and I have more than 10 years of experience in website development. I am confident in asserting myself as an expert in creating impressive and effective websites. Anyone in need of website design can contact me via Zalo at 0935040740.
Submit feedback
Your email address will not be made public. Fields marked are required *
Search
Trend
-

The most commonly used HTML tags
02-01-2020 . 11k view
-

Websites for earning money at home by typing documents
05-17-2023 . 9k view
-

-

Earn money by answering surveys with Toluna
01-12-2020 . 7k view
-

Guide to creating a database in phpMyAdmin XAMPP
04-25-2020 . 4k view


0 feedback