
When starting to learn SEO, you will explore both OnPage and OffPage SEO. In this article, I will guide you on how to optimize OnPage SEO most effectively. OnPage SEO is the process of optimizing code and website content aiming to make your web page more search engine-friendly.
Essential points to optimize when doing OnPage SEO
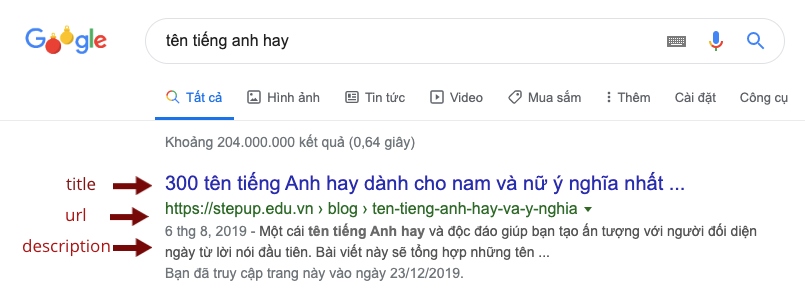
1. Url
The Url should be friendly, meaning it has to follow a hierarchical structure.
Here is an example of a SEO-friendly URL:
https://www.kiemtientuweb.com/url-la-gi.html
Here is an example of a non-friendly URL in SEO:
https://www.kiemtientuweb.com/Folder/X135642423434774/124
2. Title Tag
Your website must have a title tag, and it is located in the head tag. The title should be concise, around 70 characters, and shouldn't be stuffing over 2 keywords.
3. Description Tag
Your website has to have a description tag, also added in the head tag. This tag briefly describes the content of the website, so you have to make it concise but includes the main content, and limit it to around 160 characters.
If you don't have a description tag, then Google will automatically scan and extract a part of the content in your website that corresponds with the user's query to display.
4. Heading Tags
The Heading tags in HTML include six tags H1, H2, H3, H4, H5, H6 in order of priority.
The H1, H2, H3 are the three most commonly used tags, among which the H1 is the most important because it emphasizes the main content of the website.
Note: You should only use one H1 tag per page, approximately three H2 tags, and you can have multiple H3 tags. Another point to note is that many people often use CSS to hide the H1 tag, which I believe is not necessary.
5. Optimize Img Tag and Image
In the Img tag, the alt attribute is used to describe or insert keywords related to the image to help Google's bot understand and improve the SEO effect. To optimize the speed more, you should change the image to the .webp suffix.
The image name should also be correctly named as follows:
- The name of the image doesn't have accents, hyphen “-” in between.
- The name of the image doesn't have numeric characters, special characters like #, @, *, ...
- The name of the image should contain keywords related to the main keyword.
The size of the image has to match the user interface. For instance, if your interface needs to display an image with a size of 600x315, then you have to trim the image to a size of 600x315 to avoid redundancy.
<img alt="Mã giảm giá Shopee cho mọi đơn hàng mới nhất" src="https://kiemtientuweb.com/storages/posts/86/ma-giam-gia-shopee-1683482256.webp" srcset="https://kiemtientuweb.com/storages/posts/227/ma-giam-gia-shopee-1683482256.webp 227w" style="height:48px; width:86px" />

//You can see that this img tag has two sizes. To add another size, you add the srcset attribute along with the size (the w unit corresponds to px).
6. Optimize A Tag
In the A tag, the title attribute is very important, and you should not overlook it. The more SEO standard elements, the better the SEO effectiveness of your website.
7. Compress CSS, JS Libraries
Shouldn't write CSS as an attribute of HTML. Many people write like this:
<a href="/seo" style="color:red;" title="seo">SEO</a>
If you are too lazy to create a separate CSS file, then write a separate style tag instead of attaching it directly to the tag in HTML like the example above.
You should compress CSS, JS files to increase speed as well as performance for your website.
8. Add Structured Data
Structured Data is structured data, simply put, it is generated to help make your website more comprehensive. With structured data, Google's search engine can better understand the content of a web page so as to evaluate and rank that content on the search rankings.
The markup language that Google considers the best is Schema.
Schema is a form of json code used to add to your website. You can learn more through the homepage of Schema.org. Below is a basic Schema sample code, you can refer to it to add to your website.
    <script type="application/ld+json">
      {
        "@context": "http://schema.org",
        "@type": "WebSite",
        "name": "kiemtientuweb",
        "alternateName": "{{ getSetting()->description }}",
        "url": "https://kiemtientuweb.com"
      }
    </script>
    <script type="application/ld+json">
      {
        "@context": "http://schema.org",
        "@type": "Organization",
        "name": "kiemtientuweb",
        "url": "https://kiemtientuweb.com",
        "logo": "https://kiemtientuweb.com/storages/home/index/logo-main.png"
      }
    </script>
9. Add robots.txt file
The robots.txt file serves as a guide for search engine robots.
If this file isn't available, the bot will scan your entire website and can potentially expose sensitive information that you don't want to be revealed. Therefore, you need to create a robots.txt file to address this issue.
Here's an example of a typical robots.txt file:
The file mentioned above allows the scanning of every directory on the Website except the wp-admin and wp-includes directories.
10. Create a Sitemap
An XML Sitemap is a file containing all URLs of your website, or simply put, it's a system of main and sub-links displayed clearly and coherently.
The XML Sitemap is essential for SEO as it serves like a map of the website. It helps search engines to access and collect information from your website more easily, thus evaluating your website more precisely.
The simplest way to create a sitemap is to visit this link: https://www.xml-sitemaps.com/ and enter your homepage URL. The tool will generate it automatically. However, this tool is free for only up to 500 pages; if you have more, you'll need a paid account.
After creation, you will receive a list of sitemap files; you download the sitemap.xml for yourself. Then open any editor, even notepad, to edit the Priority parameters for the URLs as you wish.
Note: The Priority parameter determines the importance of URLs to the website, prioritize important URLs by giving them higher scores, the maximum being 1.0 and the minimum being 0.1.
After all that, upload the file on the same level with the index file, and update it on the Google Webmaster Tool.
11. Add SSL
In August 2016, Google officially announced that switching your website to HTTPS would be an essential factor for SEO. If Google prefers it, you should include it to ensure better SEO results.
12. Add Google Analytics
Google Analytics is the leading website analysis tool currently, and every website should incorporate it.
13. Add DMCA
The DMCA is very necessary currently as many 'dirty' SEO units use this method to sabotage their competitors. If you have the means, consider purchasing the Pro version for faster DMCA report handling. The method to add DMCA is very simple, similar to the method for verifying website ownership on GSC.
14. Invest in Content
Content is King.
After optimizing the components I mentioned above, the deciding factor whether your Website can top the list or not lies in the content. Nowadays, search tools have become very intelligent, if you build good content, you will automatically rank higher quickly.

Ngọc Phương
Web Developer
Thank you for visiting my blog. My name is Phuong and I have more than 10 years of experience in website development. I am confident in asserting myself as an expert in creating impressive and effective websites. Anyone in need of website design can contact me via Zalo at 0935040740.
Submit feedback
Your email address will not be made public. Fields marked are required *
Search
Trend
-

The most commonly used HTML tags
02-01-2020 . 11k view
-

Websites for earning money at home by typing documents
05-17-2023 . 9k view
-

-

Earn money by answering surveys with Toluna
01-12-2020 . 7k view
-

Guide to creating a database in phpMyAdmin XAMPP
04-25-2020 . 4k view


0 feedback